Ever find an email you opted-in to receive in your spam or bulk folder?
Popular email providers (AOL is by far the worst about this, followed by Yahoo) often decide that emails you requested are spam. They’ll put them in your spam folder. Sometimes, they don’t deliver your emails to you in any folder.
If there are emails you want to be sure to receive (like emails about new posts and videos in the Marketing Rebel Insider’s Club)…
… you can take the “spam / not spam” decision away from your email provider by “whitelisting” email addresses you want to be sure land in your inbox.
Spouses, children, and close friends should probably join Marketing Rebel on your white list 🙂 .
There are three simple steps to getting the emails you want in your inbox.
- Reply to the email. Just one time. This might be all you need to do for big email providers like Gmail / Google and Yahoo.
- Add the sender (stan@marketingrebelemail.com in this case) to your Contacts.
- Follow your email provider’s whitelisting steps. The primary email providers are down this page.
NOTE: Email providers change their steps frequently. If you find something on this page out-of-date or missing, please head to MarketingRebelSupport.com and let us know.
You should test this process immediately by whitelisting the email address that sends you information about your Marketing Rebel products and coaching programs – stan@marketingrebelemail.com.
LAST TIP: – If you send bulk emails to your prospects and clients, check out Part 2 of the email marketing course available to Marketing Rebel Insider’s Club members – Getting Email Delivered… Read… and Acted On. That lesson is about doing everything you can to keep the emails you send out of the spam filter.
Click to jump to your email provider or tool, or scroll down the page.
Gmail
Yahoo
AOL
Other Email Client or Service: Outlook.com (previously Hotmail, Windows Live, Outlook, MSN Email)
Earthlink, AT&T, Comcast, Mozilla Thunderbird
Norton AntiSpam, McAfee Products, Trend Micro, SpamAssassin, Barracuda Networks
SaneBox, SPAMfighter, Cloudmark SpamNet, Mail Washer, ChoiceMail, Spam Sleuth
Gmail:
If our emails land in your promotional inbox and you want them in your primary inbox:
1. Open your Promotional inbox
2. Hover over the MRIC email listing (don’t open it)
3. Click and drag the mouse to the box that says “Primary”. It will say “move 1 conversation” as you drag the mouse
4. Release the mouse button when you get to the “Primary” box. You will then be asked if you want all email from that address to go to the primary box. Click on “yes”.

To remove the “social” and “promotions” inboxes:
1. Click on the gear icon (upper right)
2. Under “Inbox Type”/”Default”, click on “Customize”
3. Uncheck the boxes next to all but the primary inbox.
4. Click “Save”.
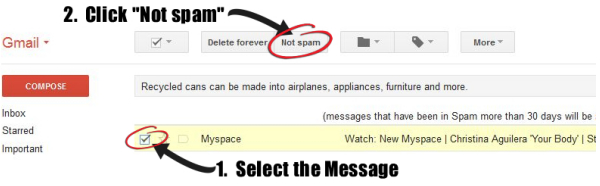
If one of our emails lands in your spam folder:
- In your spam folder, select the email
- Click “Not spam”
To add our email address to your contact list:
- Open the email
- Hover your mouse over the sender’s name and a box will appear
- At the upper right of the box there is a plus sign next to an image of a person. Click on that.
- The email address will be added to your contacts. A pencil will appear. If you want to edit the contact, click on the pencil.
Yahoo:
If one of our emails lands in your spam folder:
In your spam folder:
- Open the email.
- Click on “Not spam” in the top toolbar.
To add our email address to your contact list:
- In your inbox, check the box to the left of the sender you want to add to your contacts
- Above the list of inbox messages, to the right of “Spam” there are 3 dots, which are for “more options”. Click on it.
- At the bottom of the drop-down menu, click on “add sender to contacts”.
- Edit the information in the box that appears.
- Click “Save”.
Create a Filter To Ensure Delivery
- – Move your mouse over or tap the Gear icon in the top right navigation bar..
- – Select Settings from the list that drops down.
- – Choose “Filters” located on the left side of the page.
- – Click the “add” button on the Filters page.
- – Create a name such as “Whitelist” in the “Filter name” field.
- – In the “From” field select “contains” .
- – Enter our email address stan@marketingrebelemail.com on the line below “Contains”
- – Choose the destination folder to which you would like the message delivered. For example: Inbox.
- – Click or tap “Save…”
- – You will see in the next screen -Deliver to Inbox if From contains Marketing Rebel.
- – Click or tap Save on this screen.
- – You will be returned to your Yahoo! Inbox.
AOL:
If one of our emails lands in your spam folder:
- In your spam folder, select the message
- Click on “Not spam”
To add our email address to your contact list:
- Open the email
- Beneath the sender’s name, hover over the sender’s email address
- In the drop-down box, click on “Add to Contacts.
- Fill in the name of the contact in the box that appears in the right margin, plus any other info you want.
- Click on “Save”
To add a contact manually:
- In the left column, click on “contacts”
- In the top menu, to the right, click on the avatar of a person with a “+” sign to its left
- Fill in the info (name and email at the least)
- Click on “Save”
Outlook.com (Previously Windows Live Mail, Hotmail, MSN Email)
In the new Outlook.com you must click the Wait it’s safe link if you find emails incorrectly identified as spam.
Entering the email contact in the address book or contacts no longer whitelists the sender.
To ensure messages from specific email addresses are not sent to your Junk Email folder, you can do one of two things:
- – Check the Junk folder. If you see the Marketing Secrets email in your Inbox
- – Open the email from Marketing Secrets…
- – Click the “Wait it’s safe” link did
Other Email Client or Service:
The following was created from information obtained from a third party.
We are providing this information as a service to you, but since we obtained it from a third-party, we cannot guarantee its accuracy.
Earthlink
If you are not receiving email at Earthlink, there are two actions you can take.
-
- – Check “Suspect Email” folder
- – Add to your address book
With Earthlink, if you have SpamBlocker turned on, suspect messages are automatically send to your Suspect Email folder if the Domain is not in your address book.
Suspect Email Folder
-
- – While in the “Suspect Email” folder, if you see Marketing Rebel Insider’s Club…
- – Select the “Move to Inbox and Add Contact” option from the pull down menu.
- – This will add stan@marketingrebelemail.com to your Address Book for future email delivery assurance.
Address Book Inclusion
-
- – Open the email.
- – Click “Add to Address Book” in the email header.
- – Use the “Address Book Editor” to verify the sender’s contact details and click “save.”
- – Fill in stan@marketingrebelemail.com as the email address of the sender.
- – Any mail sent with the same Domain (right of the @ sign) will now be delivered to your Inbox.
AT&T
-
AT&T no longer maintains their own inbox.
Instead you can find your AT&T emails at Att.Yahoo.com
Please follow the Yahoo instructions for whitelisting an ATT.net email address.
Comcast
- – Please open the email from Marketing Rebel Insider’s Club
- – Click on the button at the top left of the email that says:
| stan@marketingrebelemail.com |
| + Add to Address Book |
- – That will open your edit contact screen
- – Then click “Save” and you’re all done.
Mozilla Thunderbird
If an email from Marketing Secrets appears in your Junk Folder:
Please mark that message as Not Junk.
Next, please add Marketing Rebel to your Address Book:
- – Click the Address Book button
- – Make sure the Personal Address Book is highlighted
- – Click the New Contact button.
- – Under the Contact tab, copy and paste the “From” address, stan@marketingrebelemail.com into the email dialogue box
- – Click OK
Norton AntiSpam
This problem may happen if stan@marketingrebelemail.com is accidentally added to the Blocked List.
To remove the stan@marketingrebelemail.com from the Blocked List:
- – Start your Norton product.
- – Click Settings.
- – Depending on your Norton product, do one of the following:
For Norton 360:
-
- In the Settings window, under Detailed Settings, click AntiSpam.
- On the Filter tab, next to Blocked List, click Configure.
For Norton Internet Security:
-
- In the Settings window, on the Network tab, click Message Protection.
- Under AntiSpam, next to Blocked List, click Configure.
In the Blocked List window, select the item that you want to remove, and then click Remove.
- – Click Apply, and then click OK.
- – If you do not find stan@marketingrebelemail.com in the Blocked list, go to next step.
To add stan@marketingrebelemail.com to the Allowed List:
-
- – Start your Norton product.
- – Click Settings.
- – Depending on your Norton product, do one of the following:
For Norton 360:
-
-
- In the Settings window, under Detailed Settings, click AntiSpam.
- On the Filter tab, next to Allowed List, click Configure.
-
For Norton Internet Security:
-
-
- In the Settings window, on the Network tab, click Message Protection.
- Under AntiSpam, next to Allowed List, click Configure.
-
-
- – In the Allowed List window, click Add.
- – In the Add Email Address window, from the Address Type drop-down, select the address type.
- – Add stan@marketingrebelemail.com, and then click OK.
- – In the Allowed List window, click Apply, and then click OK.
McAfee Products
While McAfee has removed spam protection in the latest Anti-Virus software- You may still have a version that offers spam filtering.
-
- In order to add the friends to whitelist, please open McAfee and click on ‘Web & Email Protection”
- Then click on “Anti-Spam”
There you can see various settings. You can change the spam protection level, change filter settings, ect.
-
- Click on “Friends list”
- – Please add stan@marketingrebelemail.com to your “Friends List” to always allow emails from Marketing Rebel Insider’s Club.
Trend Micro
If you received an email message that was incorrectly moved to the Spam Mail folder by the Anti-Spam Toolbar you can prevent this from occurring in the future.
The Anti-Spam Toolbar detects spam by looking for certain keywords in the email’s subject or body and matching it with the anti-spam pattern file. Occasionally, it may detect what you consider legitimate email as spam.
To prevent this from occurring you can do either of the following:
-
- – Add the sender to the list of Approved Senders
- – Decrease the Spam Email Filter Strength
Note: You can also select the email and click Not Spam to report it to Trend Micro. However, this feature serves only as a reference when we develop our spam database, and it may not have an effect on how the toolbar detects spam.
Add the sender to the list of Approved Senders
-
- – Open Microsoft Outlook.
- – Click the Spam Mail folder then select the legitimate email detected as spam.
- – Click Approve Sender on the toolbar.
- – Click Yes when the confirmation message appears.
Decrease the Spam Email Filter Strength
-
- – Open Microsoft Outlook.
- – Click Trend Micro Anti-Spam then click Settings.
- – On the Spam Filter tab, move the slider bar to select a lower filter strength.
- – Click OK to save your settings.
SpamAssassin
-
- – Add the following entry to your user_prefs file, which is found in the .spamassassin subdirectory on your web/mail server
- – whitelist_from stan@marketingrebelemail.com
- – Save the user_prefs file or move the updated copy to your .spamassassin subdirectory.
Barracuda Networks
The Barracuda Spam Firewall is a popular spam filtering solution. Barracuda uses several algorithms and processes to determine whether emails are spam. Occasionally, it will mark a legitimate message as spam. There are two methods to whitelist email senders so that the firewall will not quarantine future email.
Whitelist Quarantined Senders
-
- – Open your email client. Barracuda should send you a summary each day listing quarantined items. Choose the most recent Barracuda email message.
- – Locate the email from Marketing Rebel Insider’s Club and the sender email address stan@marketingrebelemail.com that you do not want quarantined in the future. Click on the word “Whitelist,” which is in green print to the right of the email title. This will open your list in a web browser.
- – Click the box to the left of the email that you would like to whitelist. At the top of the page, click “Whitelist.” Barracuda will not block or quarantine the sender whose email address appears on the whitelist.
Whitelist Senders and Domains
-
- – Open your web browser. Navigate to your company’s Barracuda firewall homepage.
- – Click on the “Block/Accept” tab.
- – Choose “Sender Domain Block/Accept.” Enter the Domain name from stan@marketingrebelemail.com to whitelist. For example, you can enter aol.com to allow all AOL addresses.
- – You may enter a comment to remind you why you allowed this Domain. Click “Add.”
- – Click your mouse on the “Email Sender Block/Accept” tab. Enter the email address of an individual sender that you want to whitelist, such as “ stan@marketingrebelemail.com“
- – Include a comment. Click “Add.” In the future, Barracuda will not block emails from this sender.
Most Used Spam Filters
SaneBox
-
- – Open your Webmail or Gmail where you use SaneBox.
- – Open your @SaneLater folder.
- – If you find an email from Marketing Rebel Insider’s Club or an email from stan@marketingrebelemail.com in @SaneLater…
- – Please drag my email to your Inbox folder.
- – By doing this you will always get our great content in your Inbox from now on!
SPAMfighter
Highlight the email from Marketing Rebel Insider’s Club with the email address stan@marketingrebelemail.com to Whitelist.
Click “More” in the SPAMfighter Toolbar and select “Whitelist”.
Here you can choose if you want to Whitelist the email address stan@marketingrebelemail.com or the whole Domain.
To be sure that all emails from people in your Outlook contacts get through to you, you can import and Whitelist them.
To do this, follow these steps:
-
- – Click “More” in the SPAMfighter toolbar.
- – Then “Options”
- – Then “Filter settings”
- – Then “Blacklists & Whitelists”
- – Then “Whitelist email address”
- – Then “Import”.
- – Select your ‘Address Book’ and click on “Check all”
- – Click “Add”
- – Click “Apply”
If you get a pop-up box offering you to upgrade to SPAMfighter Pro it is because you have exceeded the limit of 100 addresses. You can fix this by buying SPAMfighter Pro or by deleting some of the addresses in your Black/White list. If you want delete addresses, please go to:
-
- – Click More” in the SPAMfighter toolbar.
- – Then “Options”
- – Then “Filter settings”
- – Then “Blacklists & Whitelists”
Cloudmark SpamNet
-
- – Select Cloudmark | Options… from the Cloudmark SpamNet toolbar in Outlook.
- – Click Advanced.
- – Go to the Whitelist tab.
- – Click the Add button.
- – Type: stan@marketingrebelemail.com
- – Click OK.
- – Click OK.
- – Click Yes.
- – Click OK.
Mail Washer
-
- – Click Tools, then Blacklist & Friends.
- – Click Add… on the right, the Friends list side.
- – Make sure Plain email address is selected.
- – Type: stan@marketingrebelemail.com
- – Click OK.
- – Click OK.
ChoiceMail
-
- – Open ChoiceMail
- – Click on the Senders tab
- – Choose “Approve another Sender”
- – Type in the sender email address stan@marketingrebelemail.com
- – Click on OK
Spam Sleuth
-
- – Select File, then Configure.
- – Go to the Friends category.
- – Make sure Active is checked.
- – Type: stan@marketingrebelemail.com on a line by itself in the entry field.
- – Click OK.
Marketing Rebel Insider’s Club is in no way associated with any of the brands, websites or applications quoted here. All Trademarks ® are the property of their respective owners.
If you have any questions about this (as it relates to Marketing Rebel emails), please open a support ticket at www.MarketingRebelSupport.com
You can generate your own whitelist instructions here: https://whitelist.convertri.com/